03 December 2012

Pickled

When you have a blog about doing things, you wind up taking a LOT of photos while you do things. In my mind I have formulated so many posts, but hardly find the time to post them. Here are a couple of pickling images I found while I was cleaning up files today.


Canning is hard work, but fun to do with friends. Robin came over a couple of times to help with canning tomatoes and cucumbers. The tomatoes were not from our co-op garden, but rather from her neighbor that had extra Better Boys. The cucumbers, however, are most certainly from the garden. How they will taste when we open up the jars is yet to be discovered, since we had a variety that we suffer through the bitterness at the table. The two jars that we have sampled have been very tasty, but not "spicy" as the label indicated. Our jalapeƱos were so unpredictable this year!


So far we've thoroughly enjoyed the pickles. The only jar so far that didn't taste spectacular was a "questionable" batch of very bitter cukes that we took a risk on. They didn't get enough moisture in the garden, or got too much heat (or both!). Either way, no bueno. Now we know!

01 November 2012

My Favorite Autumn Skin Savers!

This dry fall weather is already showing up on my skin. You know, the tell-tale signs of sandpaper fingers and dry (very, very dry) legs. So I'm beefing up my moisturizing! Here are a couple of things that have really helped me, as well as sticking to a night-time routine. Just a hint, if you click on the images or links it will take you to where you can buy it, or see more information on the product.

My favorite face oil has recently come from Everyday Minerals. I am loving this oil, which doesn't stay greasy on my face, and has the same healing effects as the Flexitol, but without the fragrance. I've used this in the morning by itself, spot treatment on top of my Daily Moisturizer, and as a night time moisturizer. Let's remember people, more oil balance in your skin means less wrinkles. As my skin dries out with age, I'm realizing that trying to stop the oily days of my 20s was detrimental to my skin.

Sometimes when I don't have time to wash my face (or I'm traveling), I use a Burt's Bees combo that I love. The Facial Cleansing Towelettes smell nice and fresh, my skin feels cool and a bit tingly for a bit, then I moisturize with the Night Cream. My face feels so nice the next morning!

 
Hype or no hype, the fact is that coconut oil is... an oil. It IS from nature, and this organic extra virgin version is free of chemicals and added nonsense. It's edible. It's topical. I use this instead of body lotion, as well as spot treatment for dry areas on my face. The tough part is when the room is cold and the coconut oil is a solid, so I have to scrape up bits to warm in my hand from wayyy at the bottom of the container. Time for a new container!

Ooh, did I mention that this is one of my subscribe and save items on amazon? It comes in a 2-pack and I instantly have one for the kitchen, and one for the bathroom!

Last, but certainly not least... The amazing-phenomenal-breath of fresh air-hand salve to save the day! I carry this in my purse and use it on my hands, elbows, legs, feet, neck, ears, yada yada yada. I LOVE THIS STUFF.


15 October 2012

Spell, read, write, learn vocabulary, and discuss character.

Who knew inspiration could come from Hello Kitty?

My daughter's mealtime activity book has a page that tells the child to "Think of words that describe Hello Kitty and start with the letters that make up her name." Then, it asks to do the same for your own name. It became an amazing opportunity for her to practice spelling, writing, and learning new vocabulary. Not only that, but it really gave her a nice character boost at breakfast -- you can't go wrong having a positive discussion about who she is, what she sees in herself, and what I see in her.


As you can see, I let her spell on her own, as well as helped with other words when she asked for assistance.

I also began to see it as a good exercise for adults that need a reminder of the positive characteristics that have been developed in maturity. Why not be playful in thinking of good adjectives? I recall going to a women's event at church where they asked us to write a descriptive word above our own names on our name tag. It had to be an alliteration, so that made it extra tough. Try it sometime, and try to stay positive. It can be fun, exposing, difficult, liberating, and easy, ALL at the same time.

I know most of you don't have Hello Kitty activity books, but I think it's easy enough to take a blank piece of paper, write your child's name vertically, and be free to be generous with the adjectives. If you need some help with some words, or need inspiration, take a look at Galatians 5:22-23.

04 October 2012

Love it or leave it.

I've had many conversations in the past few months that have led to questions about products that I like to use at home. I've directed some folks to my "Products I Use" page, but I have decided to add things to an amazon store to give readers a better glimpse of the products and pricing. I don't have an exhaustive selection, but it's a start! Please don't hesitate to ask questions about any of the products and I can publish any type of review that you like.

The most recent addition is a supplement that I've had questions about recently. I've literally spoken to 4 people about it in the last week, so I thought it was time to post it here for future reference...

I was searching for a meal supplement that would help with some "in between meal needs." I discovered that I needed extra protein, a bit of sugar, and it would be nice to include some digestive help. Enter Amazing Grass Amazing Meal. Organic chocolate to boot!

Check out Page 2 of my aStore for a direct link to the product.

15 August 2012

The ultimate "Do that." ...Step right up.


Wow, so apparently blogging for me has taken a major back seat in life! I have had many plans, taken many photos, formulated posts in my head, jotted down notes... but nothing has surfaced because there has been a priority hanging about.

Yes, yes-yes. I'm educating my children at home. Well, more specifically, we are starting our second year of actual-real-life-bonafide-planned-purchased-created-morphed-yet-structured home school. Not only are we pursuing a classical method, but I have signed on as a tutor in our classical community tutorial.

The ultimate "Do that."

I'm more excited than I am frightened, so that is definitely a good thing. Oh, I've taught before...home school enrichment fine art, tutorial fine art, 4th grade masters for a few weeks... all very short-term and only for 40-60 minutes at a time. This year, I'll be tutoring a 2nd grade age class for close to three hours, drilling their grammar foundations in all subjects. FUN TIMES! This particular undertaking will broaden my horizons and boost my endurance as a teacher with my own children.

All that to say, I am completely immersed in Classical Conversations. If you're thinking about a classical method, or perhaps just weighing out home school in general, please check out CC. I'll do my best to keep you updated and post those "lost summer posts" periodically. There's so much to tell you...

If you're a CC tutor or parent, you can download my weekly tutoring plan. There is also an example of how I would use the sheet in context of Week 1 (Cycle 1).

  • Update: Here is another weekly tutoring plan sample. This one has been morphed according to what I've needed the first four weeks. 

21 May 2012

Planting (Co-op Part 2)


One of the first things we did when we were in the planning phase was draw a garden plan. We did the initial sketch with a pen on graph paper, but being the graphic design nerd that I am, I had to come home and make a hard-line version, in color. The grey areas on the plan above indicate a footpath about a foot wide, and the long main path is about 2 feet wide. The guys were initially pretty accurate with the measurements so when they went ahead and put in stakes and twine as row guides, we had a grid just like the plan. The only change was switching the cucumbers and beans to allow for maximum sun exposure, and the door in the fence moved.

After we completed the first phase of work, we met at the local farmers co-op to choose our plants. Even though they had a great selection in their green house, we ended up adding a couple of varieties from another local nursery. We want oodles of tomatoes this year, with the hopes of having a canning party!

A lot of the work has fallen on the guys' shoulders while we've been dealing with illness, but that has worked out fine because of hefty labor that had to be done! They've done so much -- tilling, spreading compost, tilling again, moving many wheelbarrows of mulch, putting up the fence, laying in the soaker hose, planting, and moving more mulch. That pretty much sounds like everything, so I'd say they've done most of the work. They're amazing guys!

Planting community has been a lot of fun (on the days I've been able to go)! Unfortunately, my husband has had to go solo a few times, but we're over our virus invasion so it's back to work. We work, we chat. We work and talk, talk and work. The kids love to pick green caterpillars off of the cabbage plants, and when they're out playing in the yard we take turns keeping our eyes on them.

I'll have to get over there to take current photos in toddler phase, but for now enjoy the baby pictures.

Baby tomato plants from the local farmers co-op
Cody, our "land host"
Mike in his work gear. Handsome, in rubber boots and dickies! 

09 May 2012

Co-op, as in "cooperative."

I know that many people would cringe at the thought of sharing their yard with another family, but our friends, the Yorks, didn't flinch. Well, not that I saw at least! 


They mentioned doubling the size of their garden.
I mentioned helping tend the garden, or purchasing veggies from them.
They said, "let's have a co-op!"


Why not? We're starting small, with just 8 members. 50% of the members are under 6 years of age, but that's neither here nor there. They will most certainly eat their share!
The first thing that we did as a team was rake out the dead grass before spreading the compost. The Yorks managed to get an entire truck load of horse compost for free -- long story, but I'll tell it if you ask me to -- so we worked all morning shoveling poop across the already tilled expansion. There was no need to compost the existing half, as it was pretty nutrient rich from the previous year's composted garden. As a true testament to community, a neighbor offered his tiller for the day. He even went to pick it up somewhere else and dropped it in the backyard for us. Oh, and if that isn't enough neighborly love for you, we also borrowed a couple of shovels from some folks around the corner. All of these folks will surely be getting some vegetable gift bags from us this summer! 


While one family returned the rental truck (used to haul the compost), my husband tilled the compost in, and we went to work on the border weeds. I must say, there is great satisfaction in pulling weeds. I have more work to do, but at least we got most of one side completed. 


The north side weeded and ready for tilling.

Compost down, tilled again, ready for more fence.


There are people that are okay with sharing things with the community, building friendships, sweating a little for someone else, and feeding more than just their own family. We're learning what that feels like this year, and hopefully teaching our children that living in relationship with other people is better than isolating needs and blessings. It certainly didn't kill us, or even hurt us, to work someone else's land. It felt even less painful using borrowed tools and expensive equipment from neighbors. It made it a true community effort.

The only casualty of the day was a pair of faux leather riding boots that I've been wearing for three years. I felt it was time to dirty them up. Or in this case, horse manure them up. Darn, I guess I will need a new pair of boots this Fall! 


By the way, this is the very same friend of the juicing post last year. She's a giver!

07 May 2012

Oh yes, I did.

What do I do with sweetened condensed milk, you ask? Well, a little dab in my coffee for starters. Truthfully, a full teaspoon is heavenly at the bottom of my cup, just before I pour a double from the stovetop espresso maker.

I have to also mention that it stays in the refrigerator door and lasts a VERY long time. I'm icked out by open cans in the fridge, so we used to transfer the milk from the can into a container, then spooned it out. Not much trouble, but the availability of a squeeze bottle truly rocked our world!


Much to my dismay, I found out recently that Trader Joe's carries the squeeze bottle version of organic sweetened condensed milk as a "seasonal item." A season, I must mention, that has passed. Boo, boo, and boo.


My quick-fix? Empty the last can in the pantry, into the squeeze bottle.

Hey, don't mention it.


27 March 2012

Two out of three isn't bad, right?

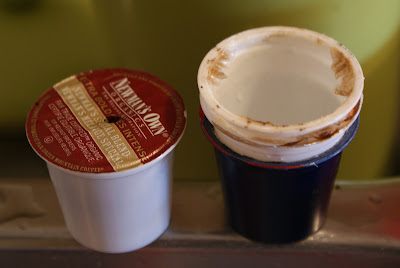
So... I am humbly writing a follow-up to my previous post about stripping a k-cup for recycling. I am still endorsing the stripping procedure, but I am simply here to tell you that I found out the plastic portion of the cup is actually NOT recyclable.

Whew! There, I said it.

That's been weighing on me ever since I found out. No, it isn't my fault or anything, but it sure does sting. A LOT. I've been tossing those little cups into the recycling bin for almost a year now and the recycling company keeps taking them (I'm not casting blame on them either). I'm sure they end up sorting them out into the landfill or burn pile (I haven't found that part out yet).

At any rate, the foil can still be recycled, and the coffee + paper filter will still be composted. We've planted some potatoes and basil seed, using some of our compost from the winter months.

The purple potatoes are breaking through!

I am still grateful for most of the product getting reused somehow, and for now I will wait for Keurig to update their plastics to a recycle grade. There are some programs out there to collect cups but I'm happy to get some use of the guts for our own plants. Check out Keurig's site if you want to read more about their social responsibility efforts.

Here are our current coffee habits that still feed coffee grounds into the compost....


1) Stovetop Espresso. Because more often than not, I have the time. It's SO good with a bit of sweetened condensed milk in the bottom when you want a treat.

2) French Press. Sometimes we want to sip on our coffee and spend some time chatting at the breakfast table. Light and frothy, yet still more robust than the regular drip.


3) The single cup coffee maker we've been discussing. The best option for reducing waste if you want a Keurig is to get a refillable k-cup. There are a couple of popular options out there (just google "solofill vs. ekobrew" and you'll see videos, blogs, etc). I've had the Solofill version for a year and I would use it only when I could stand there and watch it to make sure it didn't drip everywhere! The other day (yes, a year later) I figured out that the best way to use the Solofill -- avoid overfilling it, draw a short cup, and make sure the grind is not too fine. It makes more of an espresso sized serving so I use stronger coffee with it.

Enjoy your coffee, however you make it!

16 March 2012

How to Strip K-cups for the Recycling Bin

Last year, my husband and I decided to buy a single serving coffee maker (Keurig) for our anniversary. It is a luxury item as far as I'm concerned, yet I was able to justify the purchase by coming up with a way to recycle the k-cups. I have been avoiding this post because I didn't want it to be a "responsibility brag," but after a discussion my husband had with some friends last week, I realized that publishing our efforts could provide a solution for some people that are looking into purchasing these convenient little machines.

If you need any back story on the landfill problem, you can watch a short CNBC video here. Just remember to please come back to Do that. to read the rest of the post!

As a nerdly student of home economics, I have actually timed the following process. I took my time so that it could be considered an average person's timing, rather than whipping through the process in order to set a k-cup dis-assembly record. In the amount of time it takes to wait for your cup of coffee, you can strip the cup you removed from the machine!

1) Begin by making sure the k-cup you're about to strip has cooled down. We usually stack them by the sink so that I remember to strip them before they pile up too high. Note the convenient little hole that the Keurig machine makes in the cup foil. (The cups stacked on the right have been emptied and are ready for the recycling bin.)

2) Here's where you get dirty for a moment... Stick your finger in the hole and pull the foil up. You'll have a nice little tab that helps you remove the foil entirely by pulling outward around the rim.

3) Put the foil aside and dump your coffee into the compost (some people can recycle the foil, and others will have to throw it away). You end up with a bit of coffee and the paper filter that is glued inside the cup.

4) Grab the paper filter and pull it outward, focusing on one side, then pulling around just like you did with the foil. You can put that paper filter into the compost with the rest of the coffee.

5) Average 20 seconds per cup and you've got stripped k-cups ready for recycling, coffee grounds for your compost (or your potting soil), and a little less guilt when you hit that single serving coffee button! 


For the record, I haven't researched the internet to see if anyone else is doing this yet. Please feel free to leave a comment if you've found other bloggers or news articles on this topic.

15 February 2012

A Hearty Soup for Winter Dinners


This post has been sitting in pictures, just waiting for me to narrate. Thanks to a friend, I was reminded today that I should share this meal idea online. We had this meal a couple of months ago, but it's definitely a repeat performance waiting to happen!

While soup is enjoyed in our household year-round, winter seems to be the best time to create a hearty recipe that warms you on the inside. This creation can probably be called Soupy Meaty Hearty Goodness, or just Meatball Lentil Soup...
     
We'll start with the ground beef from our fabulous meat CSA. I seasoned it with paprika, turmeric, cumin, chili powder, kosher salt, and black pepper. Next, I added one egg and a couple of tablespoons of panko (bread crumbs). I had a dutch oven heating up on medium high heat while I formed the meatballs. 


The meatballs went into a drizzle of olive oil to brown on all sides. 
Yes, you have to actually turn them after they've browned!
While the meatballs brown, you can start chopping the vegetables. I chopped half of a large white onion that I already had, a couple of green tomatoes (I honestly don't remember why we had green tomatoes during this time, but they were good!), a large tomato from the grocery store that didn't taste like much anyway, and some kale.

After the meatballs have browned on all sides, remove the meatballs and set them aside nearby. Add a little bit of oil to the pot if you need to (I usually do because the CSA meat is so lean) and throw in the onions. Get them sweating in the pot, then add liquid in order to deglaze the pot. I used water, the last bit of a vegetable juice that I had, and a cup or so of beef stock. I also added a smidge of tomato paste that I keep in the refrigerator (it's in a tube so I can squeeze some in and put it away).
After adding the liquid, bring it to a low boil, then add your lentils to simmer for about 20-25 minutes. The total simmer time is usually around 30 minutes, but you'll want to add your tomatoes and kale for the last 5-10, depending on how tender you want them.
I served up the soup with some pita wedges and garlic hummus. A nice local syrah came with our dinner guests and made a great pairing. Thanks to my sister and her Mike! 
This meal was so hearty, so rich in flavor and substance that I would suggest making it for your family. Tweak the ingredients and simmer in whatever liquid suits you, but you can't go wrong with meatballs, lentils, a sturdy green and a tomato base.